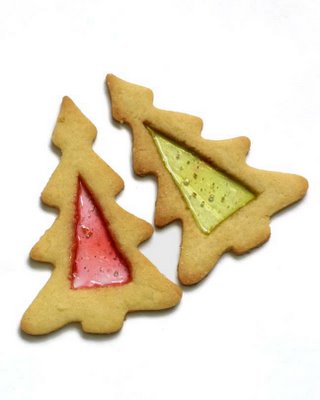
Stained Glass Christmas Tree Cookies

These biscuits have been a hit since I started making them almost a week ago. There are certainly painstaking (I manage only three dozen a day), but are worth the effort since they are pretty impressive. Given that I gorge myself with chocolate, chocolate and more chocolate all the time, I think I've forgotten how delicious plain sugar-cookies can be. And these served to remind me well -- they are crisp and not too sweet, with a rich, buttery fragrance that hits you every time you open the cookie jar. Add to that the wow factor of the luminescent stained-glass windows (made by way of chopped hard candies) and you have another winner that's going in to C's Christmas goody basket for his clients.
The recipe has been adapted from Martha Stewart Holiday Cookies, a special issue with over 100 recipes that will take me more than a year to try!
If the cookies look like a mission to make, it's because they are. Chopping the hard candies are a messy and back-pain-inducing affair, so I tried pounding them in a mortar and pestle, which was even messier. At first I thought that blitzing them in my mini food chopper might grind them too finely, but as it turns out, that is the best option. Though if you live in the hot humid tropics as I do, it might be best to grind only what you will use each time because they end up melting extremely quickly and sticking together in clumps (not to mention all over your fingertips too). On top of that, the dough is pretty soft and buttery, so it's best to keep it in the fridge until ready to use. You should also flour your work surface generously so it doesn't stick all over the place. Finally, when it's ready to go into the oven, you need to check it every couple of minutes with a toothpick in hand to fill any little holes in the "glass" as the sweets begin to melt and boil.
Now, if you're still fancy making up a batch, here's the recipe:
Stained Glass Trees (makes about 3 to 5 dozen, depending on the size of your cookie cutter)
2 cups sifted all-purpose flour, plus more (lots more!) for work surface
1/4 tsp coarse salt
1/2 tsp baking powder
1/2 cup (115g) unsalted butter
1 cup sugar
1 large egg
1 tsp pure vanilla extract
7 ounces (about 30) assorted clear coloured hard candies (colours separated and finely chopped)
Sift flour, salt and baking powder and set aside. Put butter and sugar in the bowl of an electric mixer fitted wth the paddle attachment and mix on medium speed until pale and fluffy, about 3 minutes. Add egg and mix till smooth, about 1 minute. Reduce speed to low and add flour mixture. Mix till combined and stir in vanilla. Wrap the dough in plastic and refrigerate until cold, about 45 minutes.
Preheat oven to 325 degrees F (or 170 degrees C) with racks in upper and lower thirds. Roll out chilled dough on a well-floured surface to a little more than 1/8-inch thick. Cut out shapes using a tree-shaped cookie cutter. Using a metal spatula, space 2 inches apart on baking sheets lined with parchment paper. Using the tip of a paring knife, make a triangular cut-out in the centre of each cookie. Re-roll scraps and cut.
Sprinkle candy in a single layer in the hole of each cookie, avoiding the edges of the triangle. Bake until candy has just melted and the cookie edges are just starting to turn pale golden brown, about 11-12 minutes. Midway through baking, quickly open the oven door and check for any holes in the "glass" (there will probably be lots); use a toothpick to fill them in. Try not to let the candy centres become bubbly.
Cool completely on sheets on wire racks and use a metal spatula to remove cookies from parchment.


3 Comments:
I understand why these have been a success! I wish I had the time and patience...
These cookies are awesome! Why o why i haven't seen it before christmas???
Lovely site you have.
mccoy cookie jars is a topic I cover on my site. Your readers might be interested in checking it out further.
Post a Comment
<< Home